By Sonya Percell
Container gardening is no great mystery! The work, compared to an actual, tilled-up garden patch, is minimal, and the rewards are great. The back-breaking work of hoeing, raking, and pulling the tons of weeds and bermuda grass that continually invade your garden space is gone. Nothing compares to slicing up your own fresh tomatoes for your table. Anyone who has tasted home-grown tomatoes, then tried the hot-house grocery store varieties knows there is a huge difference in quality and taste between the two.
So let's get started! The first thing you need to figure out is the type of tomato you prefer. Do you want the big, slicer tomatoes? Or perhaps you'd rather have the meaty Roma tomatoes, or the zesty cherry tomatoes for salads! Maybe you'd like all three! Whichever type you prefer, your local greenhouse can guide you to a perfect choice.
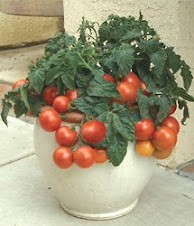
Next, you're going to need some supplies. The pots or containers should be around 18" across, more or less. The big 5 gallon paint buckets work well, even though the diameter is a bit less than 18", because they have depth. You see, if you have more soil, it will dry out less quickly, requiring less watering. If your tomatoes are in smaller pots, they are going to require more care and water. Whatever type of container you use, be sure there are holes in the bottom for drainage purposes. Next, you will need some soil. Many common outlet stores carry soil that will feed your plants for 3 months or so! Or you can buy a combination of topsoil and compost and mix them together. If you get topsoil or potting soil by itself, you will need to "feed" your plants. There's a huge variety of plant food or fertilizer out there; some is specially formulated for tomatoes. Just follow the directions on the package.
Now you have your containers, your soil, and your plants. You're ready to plant! Here's a tip: if your plants aren't too large, say 6 or 8 inches tall or so, lay the 3 or 4 inches of stem at the bottom of the plant (the part right above the dirt in the little container you buy them in) down sideways in a trench & cover with soil. Let the top few inches curve up and stick out. If any leaves are going to be under the dirt, pinch them off. What this will do is add significantly to your root system, thus creating a healthier, hardier plant. Don't worry if the part sticking up is curving. It will straighten up on its own in a few days as the plant adjusts to its new position and added root base. If the plants you purchase are too big for this, don't worry about it. They'll still grow and give you delicious tomatoes!
After your plants are established, you should keep the soil from compacting too hard around them. This probably will not happen anyway, if you buy your soil. However, if you use dirt from your yard that has a lot of clay, it tends to harden, which will keep the water from getting down to the root system quickly. A hand digger with tines is all you need to keep the soil loosened up.
As your plants grow, you will need to stake them up, or the limbs will get too heavy and fall, splitting off and damaging your plants. Tomato cages are available at your local outlet stores (like Walmart, Lowe's, etc) or you can make your own out of fencing. As long as the cage surrounds your plant and gives you places to brace up the heavy limbs with twine, you're good. Be sure not to tie the twine solidly around the stems; it will tighten too much as they grow! Just form a cradle or support with the twine that keeps the branches from drooping too much. The twine will need adjusting from time to time as your plants grow.
Keep in mind that your investment in containers, cages & a hand digger are longer-term investments, and should last several seasons. Your soil will need refreshed each spring with additional nutrient-rich soil or fertilizer and of course, you'll need new plants each year, but other than that, and some water, your investment should be quite modest compared to the benefits of having fresh tomatoes on hand.
Tomatoes do well in full sun. If, however, you're in an area where the late afternoon sun gets exceedingly hot and blisters your tomatoes, you may need to put your containers where they will be shaded during the very hottest hours of the summer. The east side of your porch or house works well for this.
Be sure and give your tomatoes enough water. Try not to water them in the hottest part of the day; the early evening or the morning is best. The water could blister the tomatoes otherwise. It is better to water deeply and a little less often. Shallow watering will not reach the entire root system.
Remember that these rules and suggestions work for peppers as well (except for laying them down to create a longer root base; I've never tried that with peppers!).
Now you know the basic rules for container gardening of vegetables such as tomatoes and peppers. It's not too late this summer; get your supplies and get going! You'll be glad you did!
Container gardening is no great mystery! The work, compared to an actual, tilled-up garden patch, is minimal, and the rewards are great. The back-breaking work of hoeing, raking, and pulling the tons of weeds and bermuda grass that continually invade your garden space is gone. Nothing compares to slicing up your own fresh tomatoes for your table. Anyone who has tasted home-grown tomatoes, then tried the hot-house grocery store varieties knows there is a huge difference in quality and taste between the two.
So let's get started! The first thing you need to figure out is the type of tomato you prefer. Do you want the big, slicer tomatoes? Or perhaps you'd rather have the meaty Roma tomatoes, or the zesty cherry tomatoes for salads! Maybe you'd like all three! Whichever type you prefer, your local greenhouse can guide you to a perfect choice.
Next, you're going to need some supplies. The pots or containers should be around 18" across, more or less. The big 5 gallon paint buckets work well, even though the diameter is a bit less than 18", because they have depth. You see, if you have more soil, it will dry out less quickly, requiring less watering. If your tomatoes are in smaller pots, they are going to require more care and water. Whatever type of container you use, be sure there are holes in the bottom for drainage purposes. Next, you will need some soil. Many common outlet stores carry soil that will feed your plants for 3 months or so! Or you can buy a combination of topsoil and compost and mix them together. If you get topsoil or potting soil by itself, you will need to "feed" your plants. There's a huge variety of plant food or fertilizer out there; some is specially formulated for tomatoes. Just follow the directions on the package.
Now you have your containers, your soil, and your plants. You're ready to plant! Here's a tip: if your plants aren't too large, say 6 or 8 inches tall or so, lay the 3 or 4 inches of stem at the bottom of the plant (the part right above the dirt in the little container you buy them in) down sideways in a trench & cover with soil. Let the top few inches curve up and stick out. If any leaves are going to be under the dirt, pinch them off. What this will do is add significantly to your root system, thus creating a healthier, hardier plant. Don't worry if the part sticking up is curving. It will straighten up on its own in a few days as the plant adjusts to its new position and added root base. If the plants you purchase are too big for this, don't worry about it. They'll still grow and give you delicious tomatoes!
After your plants are established, you should keep the soil from compacting too hard around them. This probably will not happen anyway, if you buy your soil. However, if you use dirt from your yard that has a lot of clay, it tends to harden, which will keep the water from getting down to the root system quickly. A hand digger with tines is all you need to keep the soil loosened up.
As your plants grow, you will need to stake them up, or the limbs will get too heavy and fall, splitting off and damaging your plants. Tomato cages are available at your local outlet stores (like Walmart, Lowe's, etc) or you can make your own out of fencing. As long as the cage surrounds your plant and gives you places to brace up the heavy limbs with twine, you're good. Be sure not to tie the twine solidly around the stems; it will tighten too much as they grow! Just form a cradle or support with the twine that keeps the branches from drooping too much. The twine will need adjusting from time to time as your plants grow.
Keep in mind that your investment in containers, cages & a hand digger are longer-term investments, and should last several seasons. Your soil will need refreshed each spring with additional nutrient-rich soil or fertilizer and of course, you'll need new plants each year, but other than that, and some water, your investment should be quite modest compared to the benefits of having fresh tomatoes on hand.
Tomatoes do well in full sun. If, however, you're in an area where the late afternoon sun gets exceedingly hot and blisters your tomatoes, you may need to put your containers where they will be shaded during the very hottest hours of the summer. The east side of your porch or house works well for this.
Be sure and give your tomatoes enough water. Try not to water them in the hottest part of the day; the early evening or the morning is best. The water could blister the tomatoes otherwise. It is better to water deeply and a little less often. Shallow watering will not reach the entire root system.
Remember that these rules and suggestions work for peppers as well (except for laying them down to create a longer root base; I've never tried that with peppers!).
Now you know the basic rules for container gardening of vegetables such as tomatoes and peppers. It's not too late this summer; get your supplies and get going! You'll be glad you did!